
Hello everyone, The combination of Butterfly Drawing with Flowers look so dazzling. vibrant colour of butterfly and natural smooth colour of flowers this combination make perfect colour presentation. in this blog you will learn step by step guidance to draw beautiful Butterfly drawing with flowers.
Remember, this is just a basic guidance we are providing, and you can use your creativity create intricate details, experimenting with various flower types, and using different colour combinations to make your butterfly and flower drawing unique and beautiful!
Stationery Required:
- White Paper
- Pencil HB, 2HB or any
- Colour pencils
- 0.2 or 0.5 mm black pointer pen
Step by Step Butterfly Drawing with Flowers
Remember, keep your pencils sharp, use clean colour pencils as well as clean and neat drawing paper or book. now lets start step by step process to draw butterfly drawing with flowers.
Step 1: Draw Triangles, Rectangle for Reference
First intersect two line to find the midpoint of your notebook. I draw two triangle with 5cm X 6cm X 5cm dimension and small rectangle which make separation between triangles. you can choose different dimension according to your paper size.

After completing basic geometric construction now its time to complete body structure of butterfly
- Draw three circle which connected to each other, one is small in size and the two are in elliptical shape. combination of three circle make complete body structure of butterfly which represent head, thorax and abdomen.

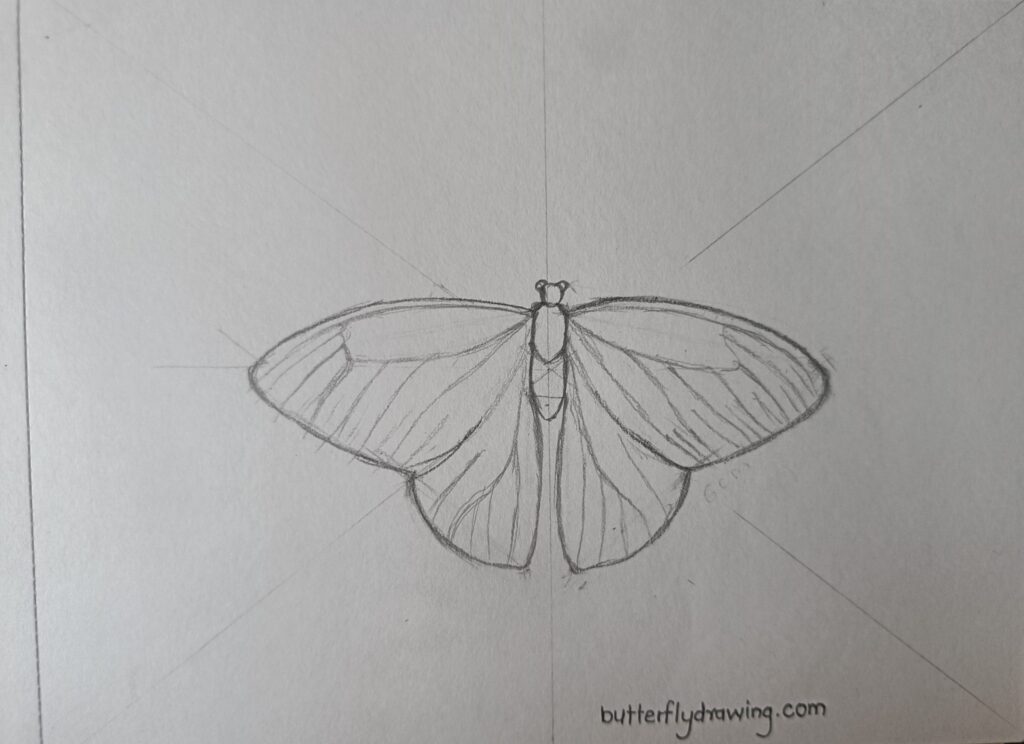
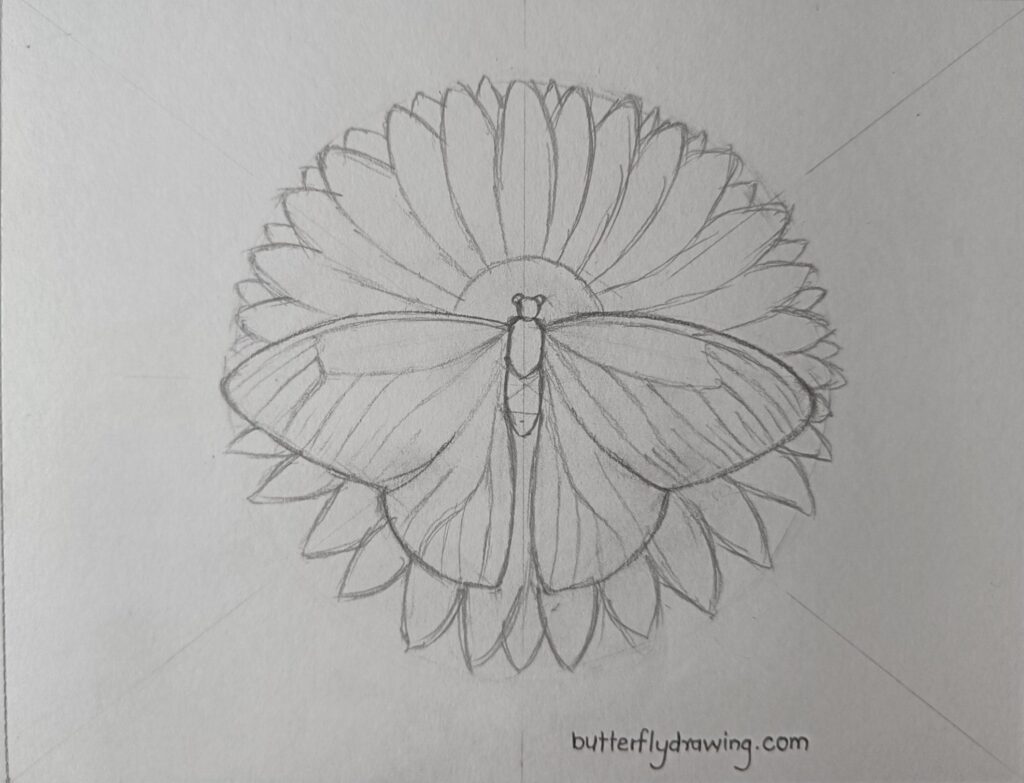
Step 2: Draw Outline of Butterfly
- help of reference line (created by intersect line and triangles) start making outline of butterfly. here I draw Monarch butterfly drawing outline.

- Erase all reference line and triangles only keep outline of butterfly. if there is any need of reference only keep centre point. keep in mind before erasing reference line make sure your drawing outline is neat and perfect as shown in below figure.

Step 3: Draw Veins Pattern
- Monarch butterflies have prominent vein patterns on their wings. Draw thick veins that run across the wings, branching out into smaller veins. These veins create a lattice-like structure on the wings. notice vein below figure one of them creating line which divide wing into two separate partition upper wing and lower wing.
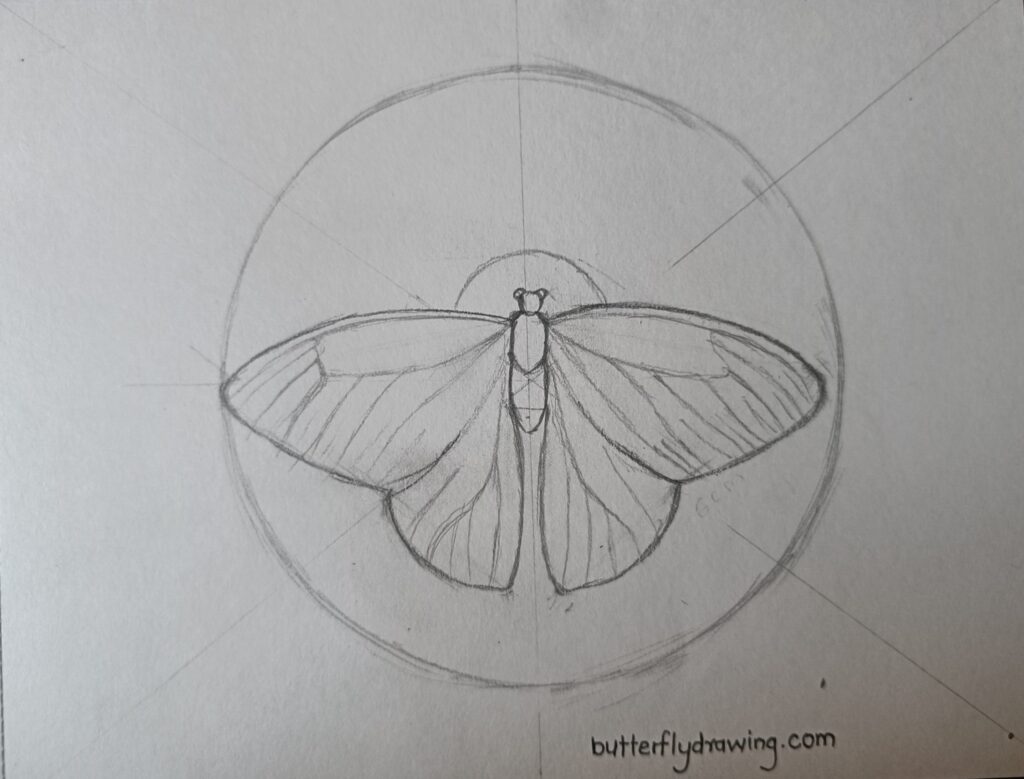
Step 4: Draw Sunflower
- Use compass to draw circle. keep pointer head on centre point of notebook and draw two circle. one circle draw near body shape of Butterly and other one is outer corner of wings.
- Sketch a series of lines or ovals around the centre circle, radiating outside like spokes on a wheel. These will serve as guidelines for the petals.

- Using the guidelines, draw large, elongated petals around the center. Sunflower petals are usually wide and pointed. Make sure they are evenly spaced around the core.
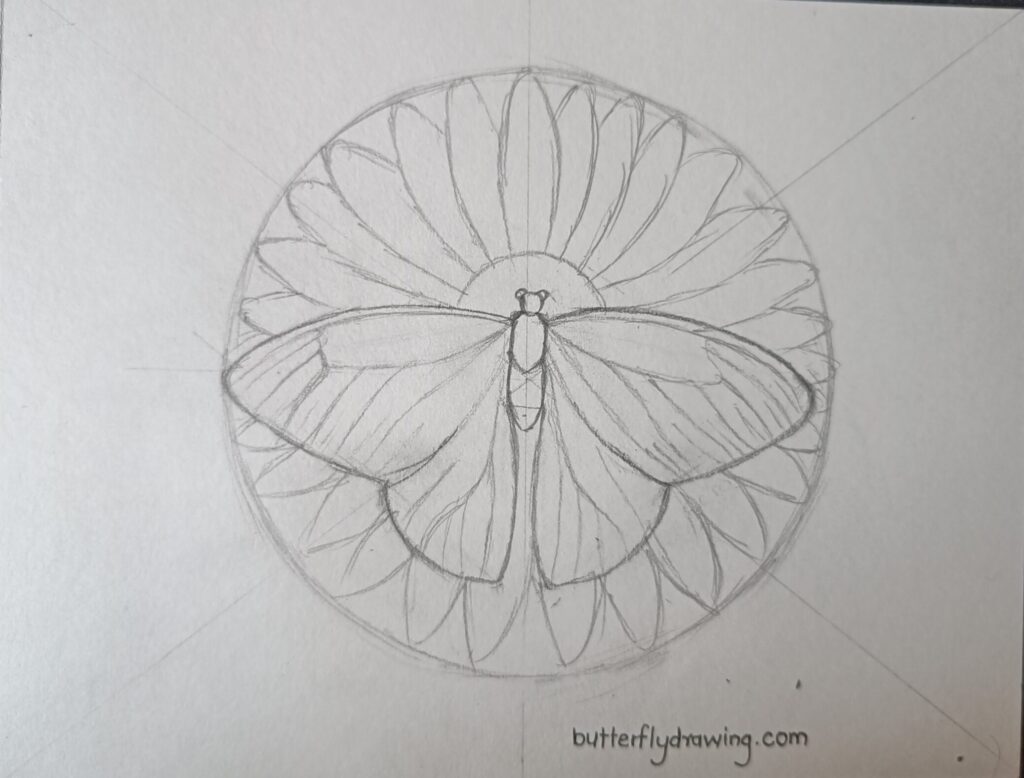
- Erase outer reference circle and make pointing petals. Add curves or slight waves to the edges of the petals for a more natural appearance.

- Draw Hidden petals between two big petals head and complete sunflower drawing.
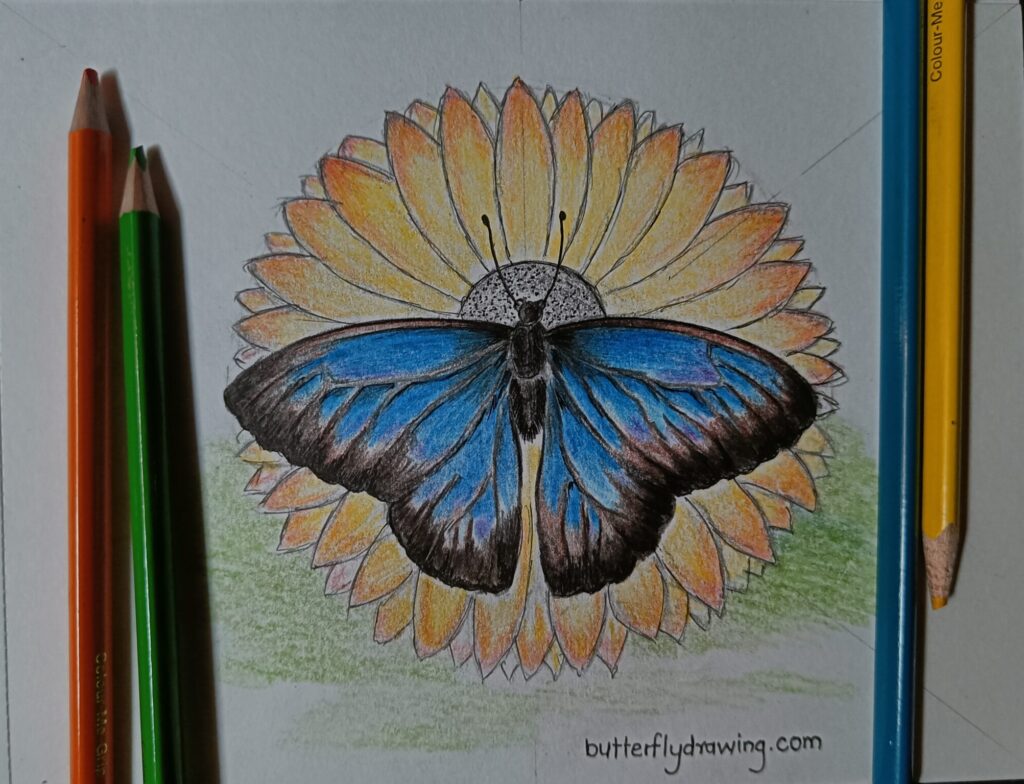
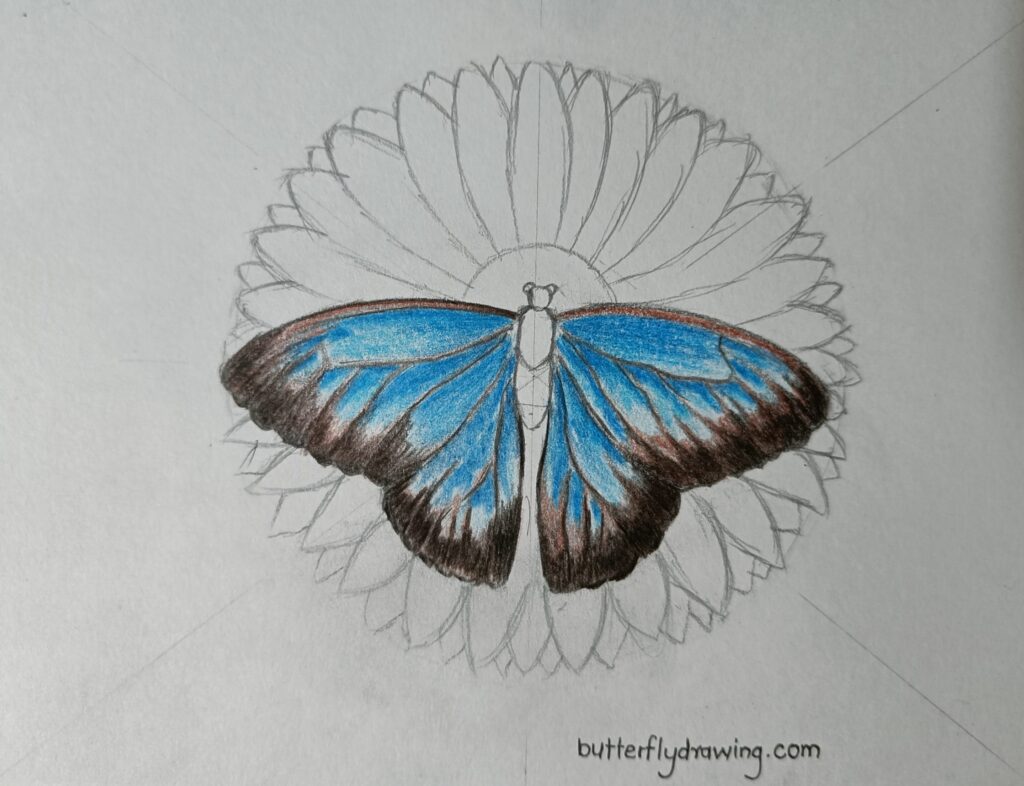
Step 5: Colour Work
shades used for Butterfly Drawing with Flowers are Light blue, Dark blue, Brown, Orange, Yellow, Red and Green.

- Pick light blue colour and spread evenly inside wing. avoid overlapping pencils vein because its can be causes black effect. use stroke method which create vein effect on wings.

- To coloured dark veins and borders on the wings first step to fill brown colour as base. touch boundaries of light blue colour and brown colour and create

- Use black coloured pencil and overlap on brown colour shade. keep in mind fill colour from wing border to insight wing vein.
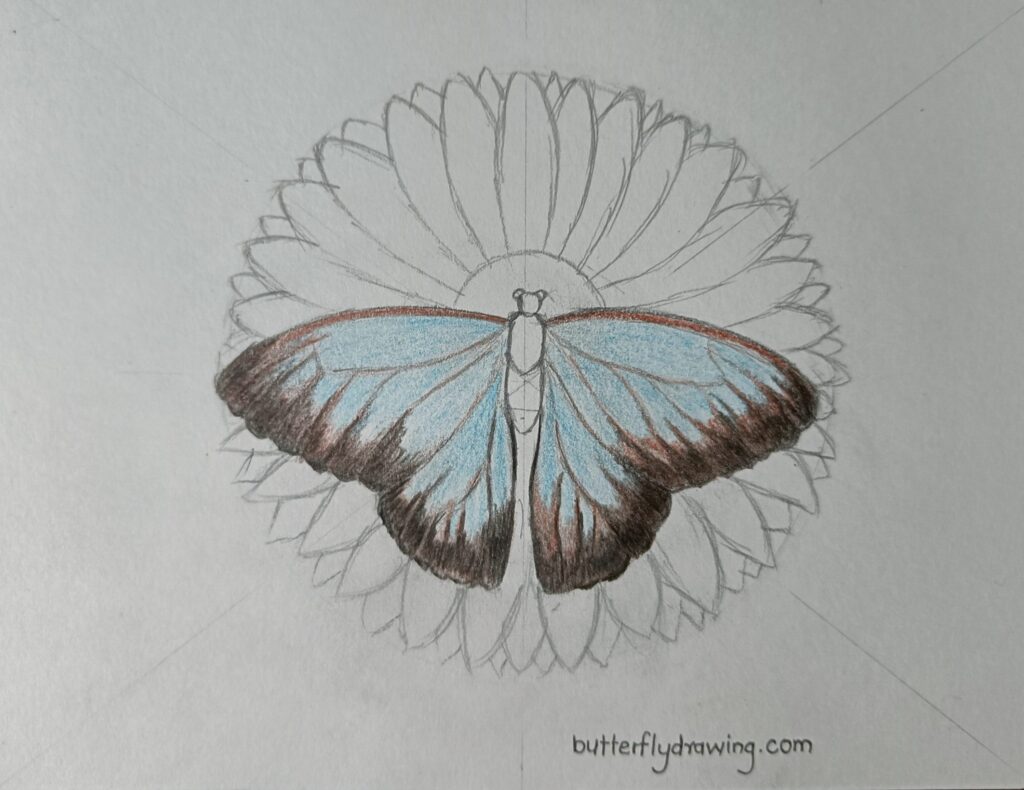
- to create dark depth effect use same shade colour and use more pressure apply and overlap on same shade. this technique create dark shade. don’t fill colour on veins. keep white gaps between black and blue colour. now use 0.2mm black pen and slightly follow pencil line and turn it into black line.
- to coloured the sunflower Use yellow or orange for the petals and a darker shade for the centre. first fill light yellow colour evenly.
- similarly use black colour for butterfly body and sketch hair by using 0.2 black pen.

- now use tangy orange pencil or red colour pencil and start creating shadow effects on petals head. again use butterfly colour and make more dark shade on wings.
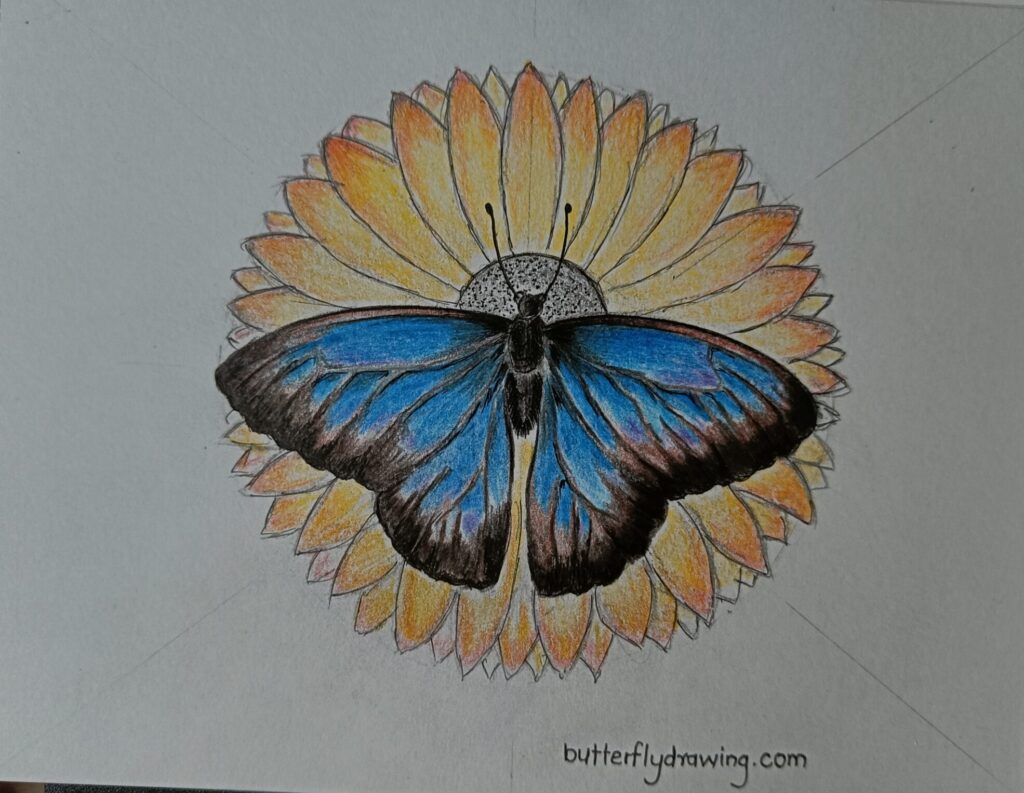
- use light green colour and create green leaf effect on base. simply rough green colour pencil to create this type of effect.

Final Butterfly Drawing with Flowers

When creating a butterfly drawing with flowers, consider the following to improve your artwork:
- Use reference images of Butterfly Drawing with Flowers to understand their shapes, colours, and details. you can search images on internet or simply search on butterflydrawing.com
- Sketch a rough layout before detailing or use geometrical construction with reference line. Determine the placement of the butterfly(alway focus to keep at centre), the types of flowers, and their arrangement.
- Maintain symmetrical sizes between the butterfly and flowers for a visually balanced composition. focus on butterfly wings pattern create more details on butterfly.
- I choose a pencil colour box. make sure colours complement each other and create a visually appealing contrast between butterfly and flowers.
- choose complementary background effect.
keep in mind, practice always make you perfect. so keep practicing and play with vibrant colour. keep learning shading techniques with pencils.
For more Tutorial learn our Butterflies Drawing Series
For Kids Check our Butterfly Drawing for Kids
Your article helped me a lot, is there any more related content? Thanks!
Your article helped me a lot, is there any more related content? Thanks!
Your article helped me a lot, is there any more related content? Thanks!
Yes! Let me know what specific information you’re looking for, and I’ll be happy to provide more related content. 😊